Tutorial: First Step in a RAG pipeline, Data Ingestion (Part 1) - Extracting and Indexing Data from Documents using LangChain.
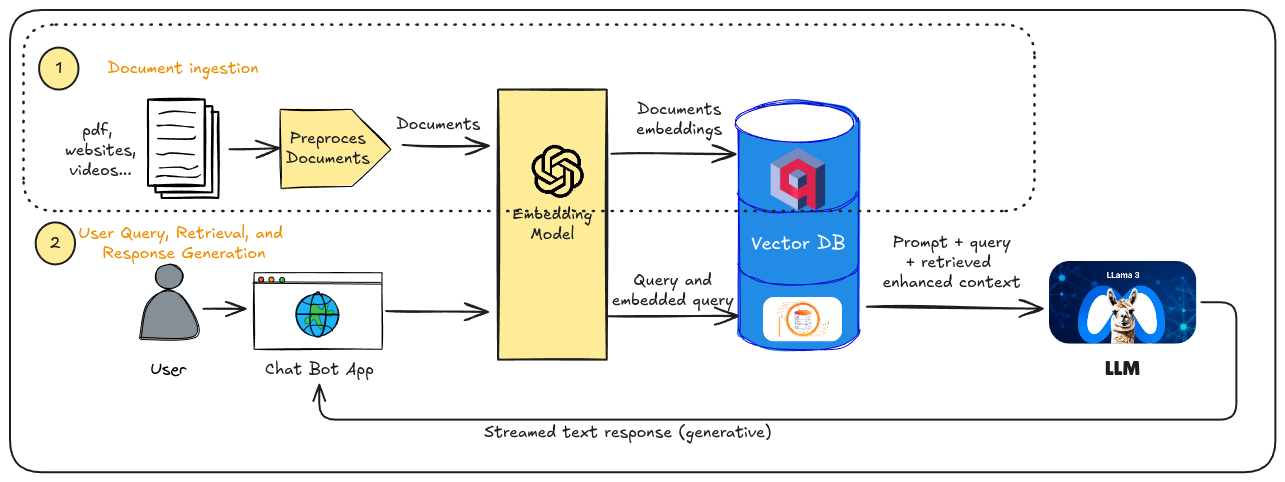
This tutorial will guide you through the process of data loading and indexing which is the first part of a RAG pipeline. But first, what is a RAG pipeline? And what parts does it have? RAG, or Retrieval Augmented Generation, is a technique that enhances the capabilities of large language models (LLMs) by providing them with relevant information from external sources. The steps in a RAG pipeline are essentially the following two:
- Document ingestion: What we want to do in this step is to extract relevant information from documents in various formats (pdf, video, websites, markdown…) and pre-process it so it can be easily store in a vector database. Once stored, we can easily retrieve this information later using a similarity search for context to our LLM.
- Retrieval of relevant information and response generation: When a user query is received, the RAG pipeline searches through dataset created in the previous step to find the most pertinent information related to the query. For this, vector databases are key since they can do the search much faster using a vector embedded system. This retrieved information is then fed to the LLM as context. The LLM, now equipped with additional context, can generate a more comprehensive and relevant response to the user’s query.
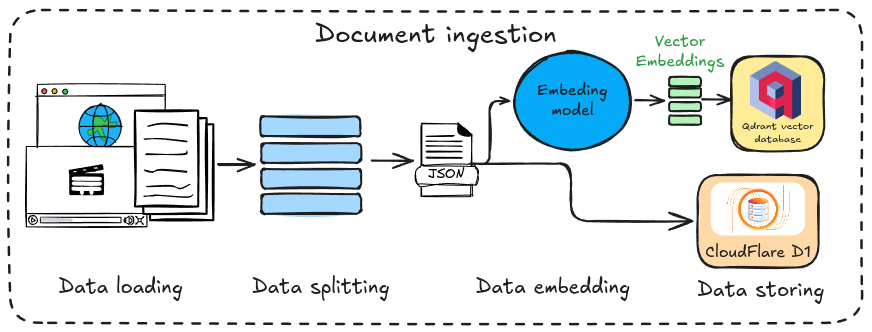
As we discussed, this tutorial focuses on data ingestion, the first step in the RAG pipeline. This step can be further divided into four sub-steps, which are represented in Fig. 1.

Fig. 1 Complete scheme of a RAG pipeline.
In more detail the steps and the technologies used in each of them are as follows:
- Data loading and data splitting: We’ll explore how to extract data from a PDF document and a website using LangChain. This powerful Python framework offers tools for data extraction from various sources (explore their website for more details). LangChain will then be used to split the data into semantic chunks suitable for the embedding model. This step, highlighted in red in the figure, is covered in the first part of the tutorial.
- Data embedding: We’ll utilize a model to transform the preprocessed text from step 1 into vectors. Sentences with similar meanings will be mapped to vectors close together in the vector space. We’ll leverage a model from Cloudflare Workers AI to generate this vectors.
- Data storing: Finally, we’ll store the generated vectors in a vector database (vector DB) for future retrieval. This tutorial utilises Qdrant, which offers a generous free tier that meets our needs. However, since Qdrant doesn’t allow storing text alongside vectors, we’ll also store the raw text in a Cloudflare D1 database for later retrieval.
Great! Let’s dive into the tutorial and explore the data ingestion process step-by-step.
Prerequisites
Before starting this tutorial, ensure familiarity with Cloudflare Workers or Cloudflare Pages, including wrangler usage and installation. For a brief overview of deploying a Cloudflare Page with AstroJS, refer to the first part of [[Chatbot in AstroJS with CloudFlare Workers AI|my tutorial for creating a Chatbot in AstroJS]].
Additionally, you’ll need the following prerequisites:
As we’ll be writing Python scripts for data loading and splitting, you’ll need to install several Python packages.
Since we’re using the LangChain framework, start by installing the core package:
python3 -m pip install langchainIn addition to the main package, we’ll need to install some dependencies for our script to function properly:
langchain-community==0.3.0pypdf==5.0.0bs4==0.0.2You can save those on a requirements.txt file and run:
python3 -m pip install -r /path/to/requirements.txtOr you can install them one by one.
Python Script for Data Loading and Data Splitting
This section outlines the creation of a script to extract and index data from a PDF document or a website, marking the first step in the data ingestion phase of the RAG pipeline. I have named the script read-document.py.
Structure of the Script
The script’s structure is straightforward, incorporating an argument parser for cleaner and more user-friendly usage. The main function will include the following:
1import argparse2
3if __name__ == "__main__":4    parser = argparse.ArgumentParser(description='Take the source type and the path to the source.')5    parser.add_argument('source_path', type=str, help='The path to the source.')6    parser.add_argument('-s', '--chunk_size', type=int, default=450, help='Chunk size for data splitting')7    parser.add_argument('-o', '--overlap', type=int, default=20, help='Chunk overlap for data splitting')8    parser.add_argument('-t', '--source_type', type=str, default='pdf', choices=['pdf', 'web'],9                        help='The type of the source. The options are: pdf, web.')10
11
12    args = parser.parse_args()13    r_splitter = splitter(args.chunk_size, args.overlap)14    split_text = []15    if args.source_type == 'pdf':16        pages = load_pdf_document(args.source_path)17        split_text = r_splitter.split_documents(pages)18    elif args.source_type == 'web':19        docs = load_web_document(args.source_path)20        split_text = r_splitter.split_documents(docs)21
22    save_document(split_text)
This structure allows you to provide the source (PDF path or URL) and optionally specify the chunk size and the overlap for the data splitting. The functions load_pdf_document, load_web_document, r_splitter, and save_document are defined at the beginning of the document, and their functionalities are explained in the following sections. To execute the script, use the following command in your terminal:
python3 read-document.py [-h] [-s CHUNK_SIZE] [-o OVERLAP] [-t {pdf,web}] source_pathFunctions to Load the Data
The load_pdf_document and load_web_document functions will load the raw data from the PDF document and the specified URL, respectively. They utilise the loader functions from LangChain:
1from langchain_community.document_loaders import PyPDFLoader2from langchain_community.document_loaders import WebBaseLoader3
4
5def load_pdf_document(file_path):6    document_loader = PyPDFLoader(file_path)7    pages = document_loader.load()8    return pages9
10
11def load_web_document(url):12    web_loader = WebBaseLoader(url)13    docs = web_loader.load()14    return docs
Splitting the Text into Chunks
After obtaining the raw data from the loaders, we need to split it into meaningful chunks that can be stored in a vector database. These chunks will then be retrieved and used as contexts for our LLM.
To accomplish this, we’ll employ another utility from LangChain called RecursiveCharacterTextSplitter:
1from langchain.text_splitter import RecursiveCharacterTextSplitter2
3def splitter(size, overlap):4    # Initialize the text splitter5    return RecursiveCharacterTextSplitter(6        chunk_size=size,7        chunk_overlap=overlap,8        separators=["\n\n", "\n", " ", ""]9    )
The RecursiveCharacterTextSplitter utilizes line breaks (\n) and spaces as separators. It prioritizes splitting on these characters first, aiming to keep paragraphs, sentences, and words together whenever possible. This approach ensures we maintain the strongest semantic relationships within the text chunks.
Saving the Data in a JSON file
Finally, once the text has been split into semantic chunks, it needs to be stored for later processing and storage in a vector database. I’ve chosen to save the text in a JSON file using the following function:
1import json2
3
4def save_document(text_list):5    text_chunks = []6    for text in text_list:7        # text_chunks.append([text.page_content, text.metadata])8        text_chunks.append(text.page_content)9    with open('data.json', 'w', encoding='utf-8') as file:10        json.dump(text_chunks, file, ensure_ascii=False, indent=4)
As noted, we’re only storing the text and discarding the metadata for this tutorial. This is because we’re focusing on using plain text for information retrieval with the LLM. If desired, you can choose to save the metadata for future use.
This concludes the first part of this tutorial. Let’s move on to the next section to set up Qdrant and CloudFlare D1 databases.