Tutorial: First Step in a RAG pipeline, Data Ingestion (Part 3) - Data embedding and data storing.
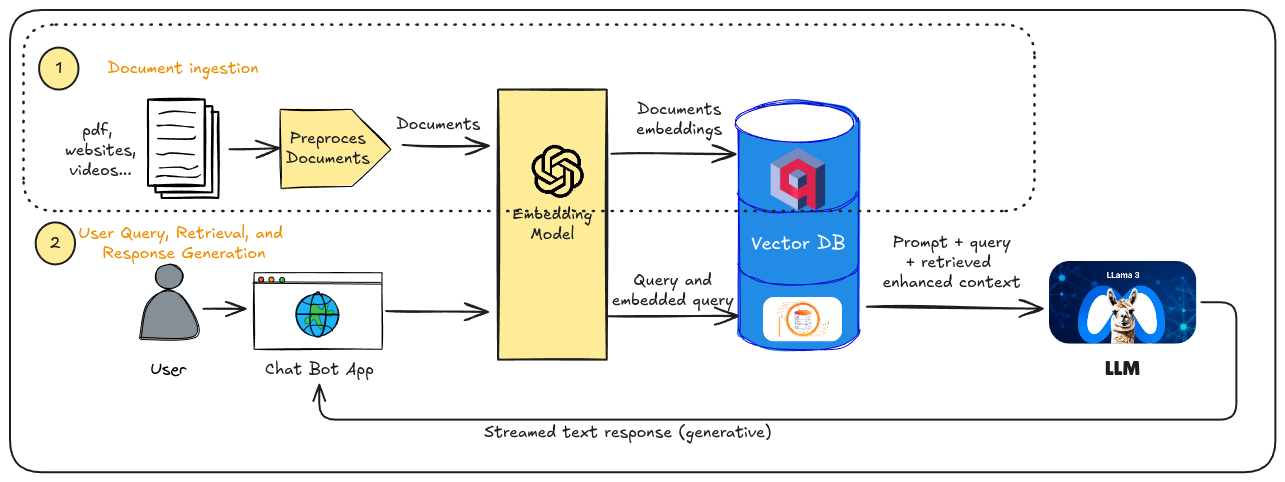
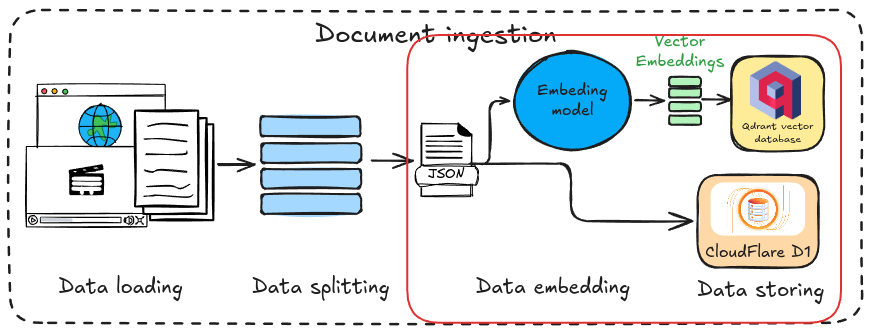
This final part of the tutorial will cover the final steps in the data ingestion phase of a RAG pipeline: data embedding and data storing. These steps are highlighted in red within the pipeline diagram.

As mentioned earlier, we’ll be using a model from Cloudflare Workers AI to generate vector representations from the text data. These vectors will be stored in the Qdrant database, while the corresponding text will be saved in the CloudFlare D1 database we created in the previous step. I’ve developed a TypeScript script to handle this process; the code explanation will be provided in the next section.
Script for Embedding and Storing the Data
We’ll begin by creating an add-notes.ts file to write the code. This script will process the data stored in the JSON file generated in the first part of the tutorial, create vector embeddings, and store the data in the databases established in the previous steps.
We’ll execute this script using tsx, a Node.js enhancement designed for directly running TypeScript:
tsx --env-file=.env add-notes.tsPlease note that we must specify the path to our .env file if we’re storing global variables there, such as the Qdrant API key as discussed earlier.
Imports and Global Variables
We’ll begin by importing the fs (file system) package from Node.js to read the JSON file containing our data, along with the utility class created in the previous step for managing the Qdrant database.
1import fs from "fs";2import { type Point, QdrantDatabase } from "../qdrant";Next, we’ll declare several variables that will be used to call the APIs of the CloudFlare D1 database and CloudFlare AI. Remember that we’ll need to employ an embedding model from CloudFlare AI to generate vectors from the text stored in the JSON file.
1// Constant for calling D1 API2const ACCOUNT_ID: string = "xxxxxxxxxxxxxxxx";3const DATABASE_ID: string = "xxxxxxx-xxxx-xxxx-xxxx-xxxxxxxxxxxx";4const D1_QUERY_URL: string = `https://api.cloudflare.com/client/v4/accounts/${ACCOUNT_ID}/d1/database/${DATABASE_ID}/query`;5
6// Constant for calling AI API7const MODEL_NAME: string = "@cf/baai/bge-base-en-v1.5";8const AI_RUN_URL: string = `https://api.cloudflare.com/client/v4/accounts/${ACCOUNT_ID}/ai/run/${MODEL_NAME}`;
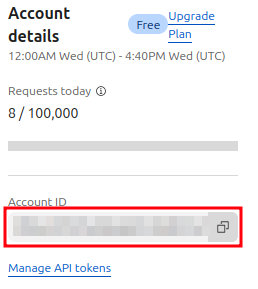
To find your CloudFlare account ID, navigate to the Workers & Pages/Overview section. It will be displayed on the right side of the screen under Account details:

The database ID can be found in your wrangler.toml file, which you created in a previous step of this tutorial. Finally, we’ll use the "@cf/baai/bge-base-en-v1.5" model to generate our vector embeddings. Remember to add the following lines to your wrangler.toml file to enable the binding with CloudFlare AI:
[ai]binding = "AI"The Main Function
Now, let’s create the main function that will handle all the processing. The initial steps involve loading the data from the JSON file and initializing the Qdrant class. Then, we’ll create a for loop to iterate through each note in the JSON file:
1async function main(filePath: string) {2  const notes: String[] = JSON.parse(fs.readFileSync(filePath, "utf-8"));3  const Qdrant = new QdrantDatabase("info", 768);4
5  let points: Point[] = [];6
7  for (const note of notes) {8    ...9  }10
11  await Qdrant.addPoints(points);12  return 0;13}
We’ll store the vectors in the points array and, at the end of the loop, store them in the Qdrant database.
Data Processing
This is the complete code within the for loop, which processes each note individually and stores it. First, we fetch the CloudFlare D1 dataset to insert the text into a row within our notes table. Then, we store the “results” field of the response in a variable called record. This variable contains the ID of the row where the text was inserted, which will be crucial for later use.
1  for (const note of notes) {2    console.log("Storing note", note);3    // Store the note in the Cloudflare D1 database using the API4    let d1Response = await fetch(D1_QUERY_URL, {5      method: "POST",6      headers: {7        "Authorization": "Bearer " + process.env.CLOUDFLARE_API_TOKEN,8        "Content-Type": "application/json",9      },10      body: JSON.stringify({11        params: [note],12        sql: "INSERT INTO notes (text) VALUES (?) RETURNING *",13      }),14    });15    d1Response = await d1Response.json();16    // @ts-ignore17    const record = d1Response.result[0].results.length ? d1Response.result[0].results[0] : null;18
19 if (!record) {20 console.log("Failed to create note", note);21 return;22 }23 ...24 }The next step involves creating the vector embedding for each note. We achieve this by calling the CloudFlare AI API. The generated vector will be stored within the response object, specifically in the result.data field. We’ll store this vector in the values variable. Once obtained, the vector is added to the points list, along with its corresponding ID retrieved from the CloudFlare D1 database insertion.
1  for (const note of notes) {2    ...3    // Create the vector for that note using the AI model from Cloudflare. Acessed via API4    let aiResponse = await fetch(AI_RUN_URL, {5      method: "POST",6      headers: {7        "Authorization": "Bearer " + process.env.CLOUDFLARE_API_TOKEN,8        "Content-Type": "application/json",9      },10      body: JSON.stringify({11        text: note,12      }),13    });14    aiResponse = await aiResponse.json();15    // @ts-ignore16    const values = aiResponse.result.data[0];17
18    if (!values) {19      console.log("Failed to generate vector embedding", note);20      return;21    }22
23 // Store vector in vectorize Qdrant database with the same id24 const { id } = record;25 points.push({26 id: id,27 vector: values,28 });29 }Calling the Main Function
Finally, at the end of the script, we call the main function, passing the path to the JSON file to be processed:
1main("./notes.json")2 .then((code) => {3 console.log("All notes stored succesfully.");4 process.exit(code);5 })6 .catch((err) => {7 console.error(err);8 process.exit(1);9 });Testing the Setup
As a final step, if you want to verify that everything is working correctly without errors, you can check if the data has been stored using the user interfaces of Qdrant and CloudFlare D1.
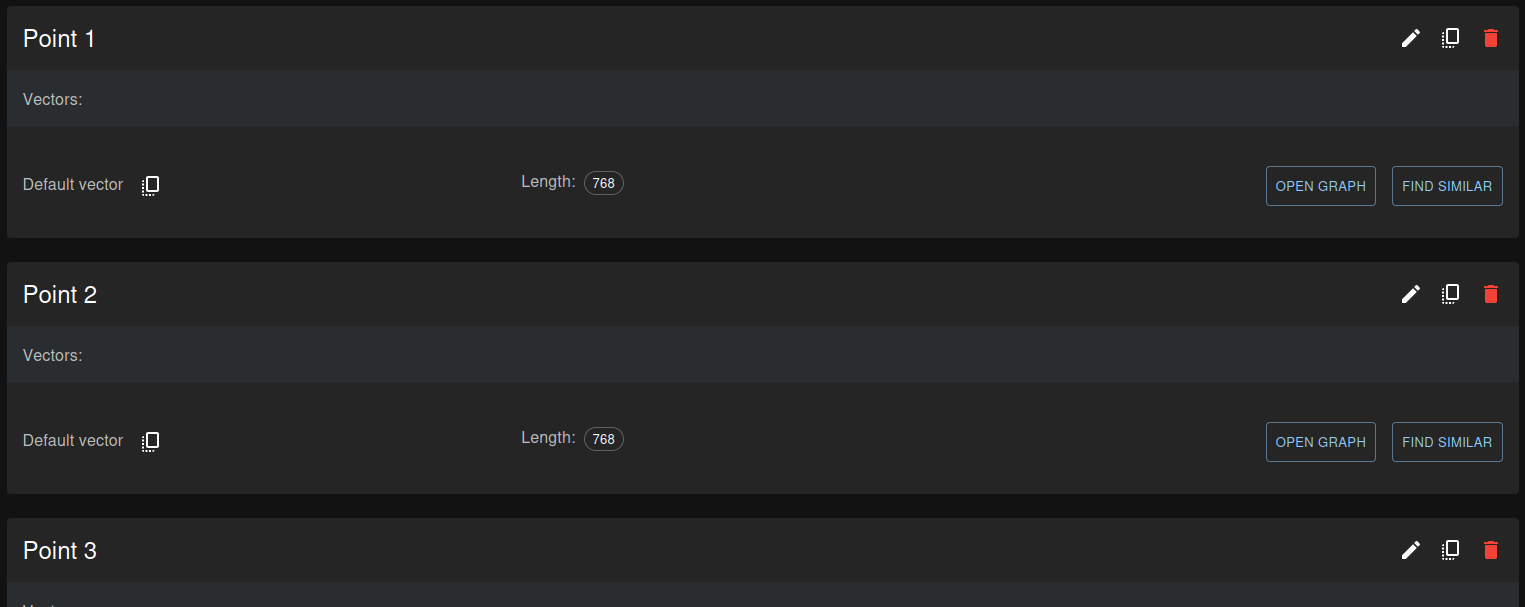
To start, for the Qdrant database, navigate to your cluster dashboard. If you’ve carefully followed all the steps in this tutorial, you should now see something similar to this:

Each of these points represents the vector for the corresponding note. The notes themselves are stored in plain text format within the CloudFlare D1 database. If you visit the D1 dashboard in your CloudFlare account, you can access the notes table and view the entries:

Conclusions
In this tutorial, we’ve explored the first of two steps in a RAG pipeline: data ingestion. This process involves loading data from various sources, splitting the text into semantic chunks, and storing them for their posterior processing. Remember that the code we saw in this tutorial is publicly available on GitHub.
As you’re likely aware, the second part of the RAG pipeline focuses on information retrieval. This involves retrieving stored information to provide the LLM with more context for answering user queries. If you’re interested in learning how to create a fully functional chatbot using a RAG pipeline, I’ll be publishing a tutorial on this topic soon.